Tuesday, 30 July 2019

Creating a mobile app with APEX - Part 9: Put the app on your phone's home screen

Now you have a cool app. But to use it you still have start your phone's browser and type an URL or select a bookmark.
In this post I will show you how to put an icon for the app on the home screen of your phone. The steps are:
- get suitable icons
- prepare your application to use the icon(s)
- put your app on the home screen

For the last step only iOS is described.
Because of the lack of an suitable Android device I was not able to describe the process for Android.
However I expect the process on Android to be similar.

Get suitable icons

The first step is to get suitable icons. Apple sets strict standards around application icons. Among others they need to come in various prescribed sizes, like 16x16, 32x32 etc.
Luckily you can find many sites on the internet to do create such an icon set for you. I have used realfavicongenerator.net. On this site you provide an image as base for the icons and the whole set is generated, even including the HTML code to add to your page.

  • go to realfavicongenerator.net
  • upload your image
  • set the options:
    • you can specify a background color
    • specify the location for the files: #APP_IMAGES#/img All the way at  the bottom of the page
    • generate the files
  • download the ZIP file with icons 
  • cut the HTML code and paste it into a file

Prepare your application

Now we will implement these icons to our application. First we load the icons in the Static Application Files:
  • go to Shared Components > Static Application Files
  • click on Upload Files and fill in the values:
    • Directory: img
    • Files: Choose the ZIP file with icons
    • Unzip File: Yes
    • Press the Upload button
  • all the icons are now available in the img directory in the Static Application Files
Then we can reference these files:
  • go to Shared Components > User Interface Attributes
  • fill Favicon > Favicon HTML with the HTML code from the previous paragraph
That's it. 
When running your application in the desktop browser, you will notice that the image in the tab next to the page name has changed to the new image. 

Put your app on the home screen (iOS)

To put your application on the home screen of your iPhone: 
  • open your application in Safari on you phone
  • log in
  • press the Share Button
  • chose Add to Home Screen
  • you will see a form with the icon. The title of the icon can be changed here
  • press Add  and the icon will be added to the Home Screen
This process is illustrated in the image below:


img 4

This way you will have easy access to your application to enter data fast. 

Happy APEXing

Wednesday, 24 July 2019

Creating a mobile app with APEX - Part 8: Implementing autologin

In the mobile app I usually enter only a few records of data like an expense or a few activities.
It is pretty annoying when I have to enter username and password each time I use the app for a few seconds. 

In most native apps the authentication is asked once and then stored safely to be reused at further use. The security lies in the presumption that the authorization has been done by unlocking the phone. For most applications this will be sufficient. Only apps with a high stake or high risk like banking apps will need additional authentication. 

So I want this scenario also for my mobile APEX apps: 
  • enter username and password the first time
  • checking the 'Stay logged in' checkbox
  • next time when starting the app the login process is done automatically and I will be led to the starting page
We can accomplish this by using cookies to store client side data. This idea has been described by Christian Rokita in this blogpost

I have created a bit different implementation without the need of an extra page:
  • a custom authentication scheme is created based on a tables with users and passwords
  • a sessions table is created to store tokens and user names
  • a package will accommodate the code needed to read and write the cookies and perform the autologin
  • on the login page the autologin procedure is called to read the cookie. If the cookie points to a valid user a session is created for this user and the session is redirected to the starting page of the application
  • on the login page a Stay logged in checkbox is added
  • an Before Header application process writes the token to the Stay logged in cookie and creates an entry for the token and the user name of the current user

Creating the database objects

You can download the file to create the tables here
Execute the script in your favorite SQL console. 
In your schema you should see:
  • the table aut_users
  • the table aut_sessions
  • the package aut_pck
The table aut_users  contains one record for a user user with a password secret. You can use this data to login to the application. Add your own users in this table.
The implementation of the authentication is very basic and just for demonstration purposes. For serious use at least the passwords should be stored encrypted!

Creating a new authentication scheme

To obtain autologin functionality we need to create a custom authentication scheme:

  • go to the Shared Components > Security > Authentication Schemes
    • press Create
    • chose Based on a pre-configured scheme from the gallery
    • press Next
      • Name: Custom
      • Scheme Type: Custom
      • Authentication Function Name: aut_pck.authenticate
    • hit Create Authentication Scheme
After creating the scheme it is automatically the current scheme.

Changing the login page

Now we will adapt the login page:
  • open the login page 9999
  • add a new process:
    • Name: autologin
    • PL/SQL code:
begin
  aut_pck.autologin
       ( p_app_id    =>  :APP_ID
       , p_page_id   =>  10
       );
end; 
    • Executing Options > Point: Before Header
    • Server-side Condition:
      • Type: Request != Value
      • Value: LOGOUT
  • add a another process:
    • Name: autologout
    • PL/SQL code
begin
  aut_pck.autologout;
end; 
    • Executing Options > 
      • Sequence: 0
      • Point: Before Header
    • Server-side Condition:
      • Type: Request = Value
      • Value: LOGOUT
  • select the Login Region
    • select the item P9999_REMEMBER
    • Change Label to Stay logged in
The last step in processing is clearing the page's session state. We need to limit that to the username and password items in order to have the value of the Stay logged in checkbox available on subsequent pages. 
  • Go to the processing tab
    • Open the Clear Page(s) Cache
    • In the attributes change Settings:
      • Type: Clear Items
      • Item(s): P9999_USERNAME,P9999_PASSWORD  This is done to keep the value of the P9999_REMEMBER in session state
  • Save the page

Adding the Application Process

We will create an application process that will fire on each page before the header on condition that the user is authenticated and P9999_REMEMBER = 'Y'. In this process the Stay logged in cookie will be written, unless there is a valid cookie.
Go create the application process:

  • go to the Shared Components > Application Processes
  • click the button Create
  • Enter 
    • Name: Write autologin cookie
    • Point: On Load: Before Header
    • Press Next
  • Enter the PL/SQL code:
begin
  -- set autologin cookie
  aut_pck.set_username_in_cookie
         ( p_username      =>  :APP_USER
         , p_remember      =>  :P9999_REMEMBER
         );
  :P9999_REMEMBER := 'N';
end;
    • Press Next
  • Enter the condition:
    • Condition Type: PL/SQL Expression
    • Expression 1: 
:APP_USER != 'nobody' and
:P9999_REMEMBER = 'Y'
  • Press Create Process
After writing the cookie the value of P9999_REMEMBER is set to 'N'. This ensures that the process only fires once after login. 

Enabling logging out

As all is set up now you will be automatically logged in until the cookie or the aut_session record expires. To give the user the possiblity to end the autologin we will adapt the logout URL. 

  • go to Shared Components > Navigation > Navigation Bar List
  • select Desktop Navigation Bar
  • click on Sign Out 
  • change Target:
    • Target Type: Page in this Application
    • Page: 9999
    • Request: LOGOUT
  • press Apply Changes
Now chosing Sign Out will result in navigating to the login page with the request LOGOUT.
Previously we have created a logout process on page 9999 which is triggered by the request LOGOUT. This process erases the cookie and removes the corresponding record from aut_sessions thus disabling the autologin. 

Testing the autologin functionality

Now you can test the functionality by logging in with the Stay logged in item checked. 
You can test the autologin by changing the session ID in the URL. Normally the session would be recognized and you would be returned to the login page. Now you just stay logged in. 

Behind the screen you can check on the existence of the cookie STAY_LOGGED_IN_xxx, where xxx is the application number using developer tools like the Chrome Inspector. Likewise you can inspect to content of the table aut_sessions, where a record should exist with the token stored in the cookie and the name of the user. 

Test the Sign out functionality. You should be returned to the login page. 

Sunday, 21 July 2019

Creating a mobile app with APEX - Part 7: Working with Time items

In part 5 of the Mobile App series the Form page was refined.
On this page there are two items containing a time value. This post will cover how to deal with these time values.

Time values are stored in the database as time fraction of a Date column. The time values in TTM are stored in the column act_start_date and act_end_date.

Three aspects will be discussed:
  • retrieving time values
  • processing time input
  • entering time values
  • special Time Input Control

Retrieving Time values

Oracle APEX does not have an item to display time values, like the Date picker does for date values. 
So we will have to display the formatted time in a Text Item. 
And the time values are not available directly in the table. So we will need a view to expose the time values from the Date columns:

create or replace force view ttm_activities_vw  as 
select act.act_id
     , trunc(act_start_datetime)               as  act_start_date
     , act.act_prj_id
     , prj.prj_name                            as  act_prj_name
     , ttm_alg.date2time(act_start_datetime)   as  act_start_time
     , ttm_alg.date2time(act_end_datetime)     as  act_end_time
     , act_description
     , act_location
from   ttm_activities     act
  join ttm_projects       prj
       on  prj.prj_id = act.act_prj_id;

This view (which is already created) exposes the start and end time in the format hh24:mi.
You can find the source of the package ttm_alg here.

Processing time input

The view of the last paragraph is the base table for the APEX form page.
In order for this to function an Instead of trigger needs to be defined, performing the insert/update/delete action. Below the code of the trigger:

create or replace trigger act_io
  instead of insert or update or delete
  on ttm_activities_vw
  for each row
begin
  if inserting then
    insert into ttm_activities
         ( act_prj_id
         , act_start_datetime
         , act_end_datetime
         , act_description
         , act_location
         )
    values
         ( :new.act_prj_id
         , ttm_alg.time2date(:new.act_start_date,:new.act_start_time)
         , ttm_alg.time2date(:new.act_start_date,:new.act_end_time)
         , :new.act_description
         , :new.act_location
         );

  elsif updating then
    update ttm_activities
    set    act_prj_id = :new.act_prj_id
         , act_start_datetime = 
                   ttm_alg.time2date(:new.act_start_date,:new.act_start_time) 
         , act_end_datetime   = 
                   ttm_alg.time2date(:new.act_start_date,:new.act_end_time)
         , act_description    = :new.act_description
         , act_location       = :new.act_location
    where  act_id = :new.act_id
    ;    

  elsif deleting then
    delete ttm_activities
    where  act_id = :old.act_id
    ;
  end if;
end;

As you see the code is much of a one-on-one conversion from view to table except for the time values. The bold code converts the time values into dates with time fraction. 

With this trigger insert, update and delete can be performed on the view and therefore the view can be source of an APEX form. So all logic is performed in the database. 

Entering time values

The time values are displayed in APEX using a Text Item.
The time values can be entered using the format hh24:mi for example 9:15
There is no need to add preceding zeros, so 9:05 can be entered as 9:5
Also for the hours the minutes can be totally omitted, so 9:00 can be entered as 9.

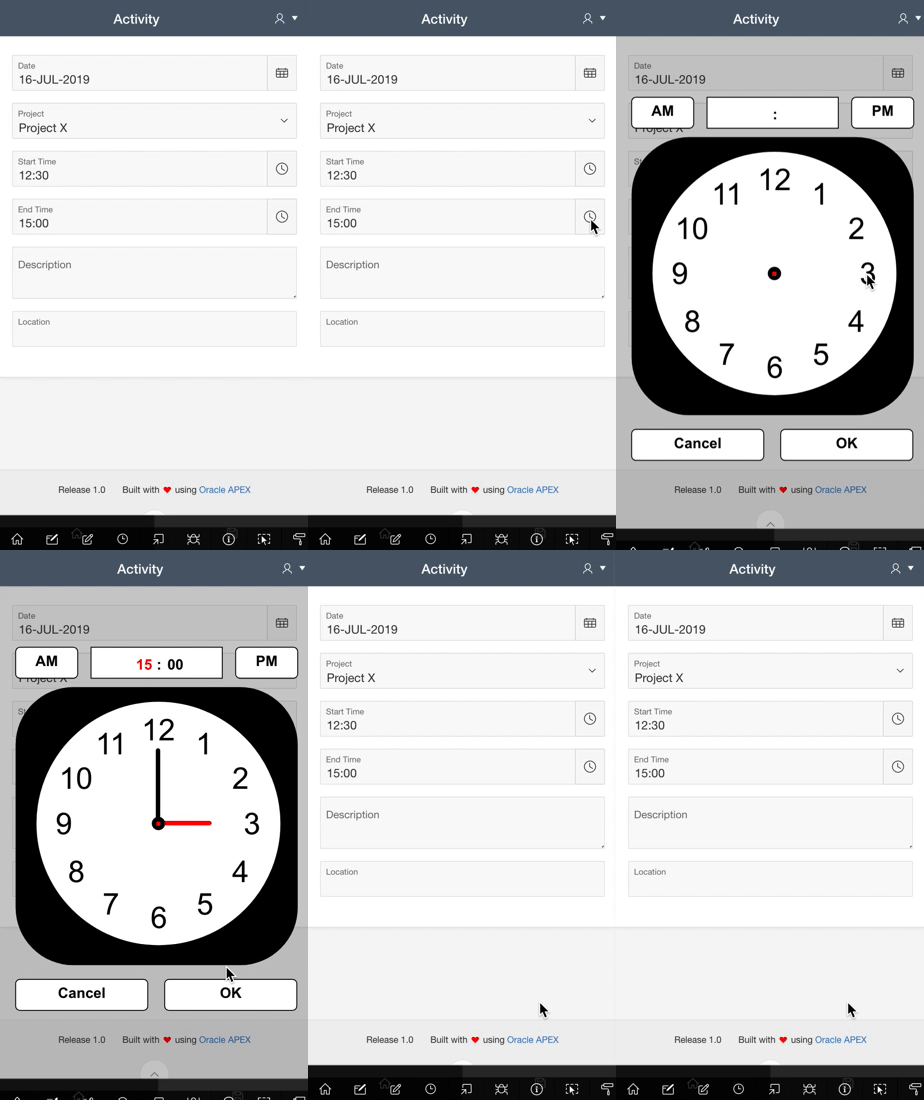
Time values can also be entered with touch gestures using the Touch Time Input control. 

Special Time Input control

Back in 2009, when I had my first Android phone, I wanted to do my time registration using the phone. Thinking about this I got the idea for a graphical time input control where a clock image is displayed on the phone and the user would use the touch screen to draw the hands on the clock, thus entering the time.

It would take some time before I would create this control. In february 2015 I wrote a blogpost about my Time Input Control, and in 2017 I published the Touch Time Input APEX plug-in on apex.world:


Recently I published a new version of the plug-in with support for floating labels. It is also easier to implement as the time picker icon is created by the plugin. The changes are described in this blogpost.

We will add a time picker buttons to the time items and connect the Time Input DA to these buttons:

  • Open Page 15
    • Goto the tab Dynamic Actions
    • Right click on Page Load and chose Create Dynamic Action
    • Select the new dynamic action and set the Name to Page Load
    • Select the action and set Identification > Action  to Touch Time Input V2 [Plug-In]

This will take care that all items with the class has-time-picker will be added with a time picker icon. Now we will mark the time items:

  • On Page 15 open the region Activity
  • Select the item P15_ACT_START_TIME
  • Set the value of Advanced > CSS classes to has-time-picker
  • Repeat for item P15_ACT_END_TIME
That's it!


Wednesday, 17 July 2019

Touch Time Input - New version

In the cause of writing my blog series on mobile development I needed to adapt the Touch Time Input plug-in for the floating labels in APEX 18.1.
So I created a new version for APEX 18.1 and up.
This version:

  • supports APEX 18.1 floating labels
  • is called from a Page Load Dynamic Action
  • applies to all items with the class has-time-picker 
  • some bugfixes
This makes the plug-in even easier to use as the marked items automagically receive a clock icon analog to the date picker:


You can download the plugin from apex.world.

For pre 18.1 APEX versions the old version of the plug-in can still be used.


Happy APEXing :-)

Thursday, 11 July 2019

Creating a mobile app with APEX - Part 5: Refining the Form page

After refining the List View now the form will be improved for mobile use:

  • screen space usage will be optimized
  • the buttons will be reorganized
  • default values will be provided
  • success messages will be made to disappear after a few seconds
  • validations for time items are created

Bugfix for trigger

There was an error in the original trigger on the view. Download a new create script here and run the script to replace the trigger.

Screen space optimization

The previous actions to improve the use of screen space also have effect on the form page. The only thing that remains to be done here is to hide the region title:
  • Open region Activity
  • Hide header by settting Appearance > Template Defaults > Header to Hidden

Buttons

For this step a new version of the CSS file is needed. Download apex_mobile.css and upload to the Application Static Files.

Below the form are three buttons, the Cancel, Delete and Create/Apply Changes button. 
The Cancel button is not needed because the List View can be reached using the Menu Bar. So this button can be Deleted.
  • delete the Cancel button
The Create/Apply Changes button will be replaced by the Save action in the Menu Bar. The CREATE and SAVE buttons are mutually exclusive. The CREATE button is shown for a new rows, the SAVE button for existing rows. 
The connect the Menu Bar Save action to the buttons a CSS save_button class is applied:
  • select the SAVE button
  • set Appearance > CSS Classes to save_button
  • select the CREATE button
  • set Appearance > CSS Classes to save_button
The action on Menu Option Save is defined as: javascript:$('.save_button').click();
This means that the element with class save_button is selected and the click action associated with this element is performed. This way either the SAVE or the CREATE button action is executed depending on which one is present on the page. 

So only the Delete button remains. This buttons will be styled in a more mobile fashion:
  • select DELETE button
  • change Layout > Button Position to Below Region
  • set Appearance > Template Options:
    • Size: Large
    • Type: Danger White font on red background
    • Width: Stretch Makes button use full width
  • set Appearance > CSS Classes: delete_button
Run the application and notice the changes. Save a new or existing activity using the Menu Bar Save option. 


Default values

Entering data on the on-screen keyboard is not easy or fast, so it is an advantage when data is prefilled. We will provide some defaults for the items.

We will use functions from the package ttm_alg. For this functionality a new version of the package ttm_alg is needed. Download the create file ttm_alg.sql and execute this file on the schema.

The first one is the date. The obvious default for this is the current date:
  • open P15_ACT_START_DATE
  • in the Default section:
    • Type : PL/SQL Expression
    • PL/SQL Expression: sysdate
The Project of the last entered Activity can serve as default value for Project:
  • open P15_ACT_PRJ_ID
  • in the Default section:
    • Type : PL/SQL Expression
    • PL/SQL Function Body: ttm_alg.last_used_project
The Start time can be filled with the last End time of today, or a default value like 9:00 if this is your usual starting time. 

  • open P15_ACT_START_TIME
  • in the Default section:
    • Type : PL/SQL Expression
    • PL/SQL Function Body: ttm_alg.default_start_time
Run the application and enter a new activity. 

We will review the possibility to use the GPS location to determine a default value for Location in a coming post. 

Success message

Standard the APEX success messages that are displayed at the top of the page must be removed manually. On mobile this is not logical. The success message indicates that there were no errors so after a short time the message can disappear.  
For this function a new version of apex_mobile.js must be uploaded to the Application Static Files. After this:

  • open Page 10
  • add to JavaScript > Execute when Page loadsset_success_message_fade();

Now if an activity is created or changed the success message will show for 2 seconds and then disappear.

Checking input

Of course the user input has to be checked.

The date value will be checked automatically.
Because the project is implemented as a select list it need not be checked.
The Description and Location are character items and need not be checked.

That leaves us both the Time items. They should be filled with a string in the form hh24:mi. Furthermore the End Time should be after the Start Time.

After this the validations can be created:
  • Open the Processing column on page 15
  • Right click on Validating > Validations and select Create Validation
  • Change the Validation:
    • Name: Check start time
    • Validation > Type: PL/SQL Function (returning Error Text)
    • Validation > PL/SQL Function returning Error Text: 
      • return(ttm_alg.check_time(:P15_ACT_START_TIME,'Start time'));
  • Right click again on Validating > Validations and select Create Validation
  • Change the Validation:
    • Name: Check end time
    • Validation > Type: PL/SQL Function (returning Error Text)
    • Validation > PL/SQL Function returning Error Text: 
      • return(ttm_alg.check_time(:P15_ACT_END_TIME,'Start time'));
  • Right click another time on Validating > Validations and select Create Validation
    • Name: Check Start Time before End Time
    • Validation > Type: PL/SQL Function (returning Error Text)
    • Validation > PL/SQL Function returning Error Text: 


Now the format of the time items and the relation between start and end time are checked. If an invalid value is entered on a meaningful error message is displayed.


Wednesday, 10 July 2019

Creating a mobile app with APEX - Part 6: Avoid autmatic zooming on iOS

If you use an iPhone to access our application you probably will have noticed the automatic zooming.
If the focus is set to an item, Safari (and Chrome also) will zoom in to this item. After zooming not all of the page is visible any more. When for example the date item is selected after zooming the date picker icon shifts out of sight. So it is desirable to avoid the auto zooming.

After some googling it is clear that the autozoom is applied to items with a font size less than 16px.

The easiest solution to prevent this zooming is to size up the font size of all items to 16px. We can attain this by applying the following CSS:

input, select, textarea {
    font-size: 16px!important;
}

Now all font size 16px is applied to all items. You can see the differences in the images below.
Left is the page with autozoom, right is the page with the fix applied.


As you can see after autozoom the page is partly invisible. The user needs to pinch to view the full page.

The !important postfix in the CSS is a bit blunt. It is used to avoid complex and extensive CSS specifications with references to Universal Theme classes.

Solution specific for iOS

Now putting this CSS on the page just like that it will affect the application for all platforms.
A more elegant solution is to apply this CSS only on iOS. That can be done by creating a region on the global page 0 and creating a PL/SQL Dynamic Region that only writes the style specification for iOS:

  • open Page 0
  • right click on Content body and select Create Region
  • select the new region
    • Name: Prevent Autozoom
    • Type: PL/SQL Dynamic Content
    • Template: - Select -
    • PL/SQL Code:

declare
  l_agent     varchar2(1000);
begin
  l_agent := lower(owa_util.get_cgi_env('user-agent'));
  if l_agent like '%iphone os%' then
    htp.p('<style>input,select,textarea {font-size:16px!important;}</style>');
  end if;
end;
With this solution the  CSS is only applied to iOS. The font sizes on other platforms are unaffected.

The user-agent CGI variable contains information about the browser and platform used. When the string iphone os is present in the lower case user-agent string the page is displayed on iOS. 

Alternative solution

There is another smart, but rather complex solution:

  • setting the font size to 16px
  • sizing the item relatively to the change in font size
  • use CSS scaling to resize the items back to the original size
This solution is described in the blog No input zoom in Safari on iPhone, the pixel perfect way by Jeffry To. 

The first solution is sufficient for our purpose, in mobile APEX applications the layout usually remains good enough.


Tuesday, 9 July 2019

Creating a mobile app with APEX - Part 4: Refining the List View

After having taken care of the general layout this post will focus on the refining of the List View page. The following actions will be performed:

  • loading a new version of the CSS file
  • adding a date picker to filter the activities
  • changing the List View query to react on the date picker
  • adding a Dynamic Action to synchronize the List View
  • optimizing screen space
  • removing the create button
  • applying advanced formatting on the List View elements

Loading new version CSS

A new version of the apex_mobile.css file should be downloaded here and uploaded to the Application Static Files.

Adding the date picker

We will create a new region and add a date picker item. The background color of the date picker region will be green. 
  • open Page 10
  • right click on Content Body and select Create Region
  • change the region:
    • Name: Parameters
    • Appearance > Template Options:
      • check Remove Body Padding
      • set Header to Hidden
    • Advanced > Static ID: parameters this will style the region
  • drag this region above the Activities region
  • right click on the region Parameters and chose Create Page Item
  • make the following changes to the new item:
    • Name: P10_DATE
    • Type: Date Picker
    • Label: Date in week
    • Default:
      • Type: PL/SQL Expression
      • PL/SQL Expression: sysdate
    • Warn on unsaved changes: Ignore Prevent warning when leaving page

Changing the List View query

The source query of the List View should be changed to reflect the values of the date item. 
Add the following where-clause to the query:


from   ttm_activities_vw     act
where  trunc(act_start_date,'iw') = trunc(to_date(:P10_DATE,'dd-mm-yyyy'),'iw')
order by trunc(act_start_date) desc, act_start_time

With this where clause only activities in the same week as P10_DATE are shown.

Dynamic Action to synchronize List View

When at this point the date is changed there is no effect on the List View.
We will need to define this behavior with a dynamic action:

  • Right click on the item P10_DATE
  • Pick Create Dynamic Action
  • Change the Name of the DA to P10_DATE change
  • Change the first True Step:
    • Action: Execute PL/SQL Code
    • PL/SQL Code: null;
    • Items to Submit: P10_DATE this is needed to load the value into session state
  • Right click on this step and chose Create Action
  • Change the new action:
    • Action: Refresh
    • Affected Elements > Selection Type: Region
    • Affected Elements > Region: Activities
Now a change of the date item results in a requery of the Activities region.

Optimizing screen space

There still is some screen space that is not used effectively. We do not need the region title as it shows in the Top Bar. The Create button can be deleted as this function is provided in the Menu Bar. And there still is excess of white space...
So let's get going:
  • Open the region Activities:
    • Edit Template Defaults:
      • Check Remove Body Padding
      • Set Header to Hidden
      • Set Style to Remove borders
    • Edit the region's Attributes
      • Uncheck Settings > Inset List 
  • Delete the Create button
You can clearly see the difference between the page now and before:


Even though the date item has been added the vertical space taken up by the List View is less than before.

Advanced formatting

In the design in Part 1 of this series we have defined that the List View elements should have a colored bar left of the text. 

Also the Location should be part of the information shown, behind the Project name. But location is not as important as the Project, so we need to decrease the emphasis on Location, or increase it on Project. 
Increasing emphasis can be done by using Bold text, decreasing can be accomplished by a lighter font color, usually a grey tone or a smaller font size.
To apply this on one line we need to use Advanced Formatting within List View.

The base query for the List View has to change because we need separate elements which were combined in the previous view:

select act.act_id
     , to_char(act_start_date,'fmDay, fmMonth fmddth yyyy ')    
                                     as  start_date
     , act_prj_name                  as  project_name
     , case act_prj_id
           when 1 then 'cornflowerblue'
           when 2 then 'green'
           when 3 then 'yellow'
       end                           as  project_color
     , act_location                  as  location
     , act_start_time
       || ' - ' ||act_end_time       as  period
     , act_description               as  description
from   ttm_activities_vw     act
where  trunc(act_start_date,'iw') = trunc(to_date(:P10_DATE,'dd-mm-yyyy'),'iw')
order by trunc(act_start_date) desc, act_start_time

To apply the advanced formatting:

  • Open the Activities region
  • Apply the new query
  • Go to Attributes
  • In Settings:
    • check Advanced Formatting You see that the available items change
    • Fill in the values from the table below:
List Entry Attributesstyle="margin-left:15px; border-left:5px solid &PROJECT_COLOR."
Text Formatting
Supplemental Information Formatting


The columns from the query are referenced by name preceeded by an ampersand and with a trailing dot, like &PROJECT_NAME.. For clarity the styling is done in-line, normally you would CSS classes. 
When running the application you can notice the difference between the various parts of the List View elements.
The colored bar is created by the List Entry Attributes. Note that you can also reference query columns here.

The List Divider has been styled. In order to provide more contrast with the elements it has received a white font on a dark grey background. This is done by applying CSS in the apex_mobile.css file:

li.a-ListView-divider.ui-bar-inherit {
    background-color: rgba(0,0,0,.55);
    color: white;
}

The Universal Theme classes are used to reference the List Divider. 

The List View page now looks and functions according to the specifications:


In the next Episode we will refine the Form page.