Friday, 22 December 2017

First impressions on mobile support in APEX 5.2EA

For APEX 5.2 the support of JQuery mobile to create mobile applications will be discontinued. The APEX development team have taken action to enable mobile development using the Universal Theme. In APEX 5.2EA you can already find the List View Region that will replace the equivalent component in JQuery Mobile.

The List View Region is defined with the same properties as in the Query Mobile version:


The region source contains a query and in the Attributes the role of the column is assigned.
After creating a page with a List View it looks like this.


So the data is present, but the formatting is not. So I read the release documentation again, found on the home page of APEX:


In the features document there is a paragraph about the List View Region.

Apparently we have to look into the Known issues. Here we find:


OK, that's easy. So the link is copied and pasted in the page's CSS file attribute. But alas, the file cannot be found :-(.
But it is visible that it is a JQuery mobile file. And of course that file can be found on the internet.
Indeed, a reference is found:

http://code.jquery.com/mobile/1.4.5/jquery.mobile-1.4.5.css

Unfortunately this does not work, because Chrome does not accept mixed content ( mixed being both http and https). Luckily we get a warning in the Browser Inspector, and the https equivalent is available, so we use:

https://code.jquery.com/mobile/1.4.5/jquery.mobile-1.4.5.css

Now our page looks like this:

Much better, isn't it? It can still be improved though:
- there is a bit of wasted space to be recovered
- the search item can be styled
- the divider can use a bit more emphasis

So a bit of CSS is added:

/* remove wasted white space */
.t-Body-contentInner {
    padding: 0;
}
html .ui-filterable + .ui-listview, html .ui-filterable.ui-listview {
    margin-top: 0em;
}
.ui-filterable {
    padding: 4px 12px;
}

/* style search item */
.ui-filterable input {
    border: 1px solid lightgrey;
    width: 100%;
    padding: 0px 12px;
    border-radius: 4px;
}

/* give list divider background color */
.ui-listview > .ui-li-divider {
    background-color: lightgrey;
}

And now the page looks like this:


I could not resist also styling the counter as a badge ;-).

My conclusion is that the APEX development team are on the right track to replace the JQuery Mobile functionality.

Happy Apexing!


Monday, 9 October 2017

About a plug-in providing native Apex functionality

This Saturday I published a plug-in on apex.world to create subheaders in a classic report. I got the idea while developing a long report and it seemed like a good idea to create a plugin for it to wrap and parameterize the JavaScript code. I searched the internet for the existence of such a plug-in and found nothing.
So I set out to create the plug-in. After finishing it I wrote a blogpost and added it to the plug-in repository on apex.world. And I proudly tweeted about it.
Pretty soon I got a reply from Peter Raganitz: "Wouldn’t a control break do just that?".

I set out to check this and.. he is absolutely right. This functionality is available in Apex in a declarative way!


The only extra needed is a small CSS definition for the visuals of the headers:


.apex_report_break {
  1. background-colorlightgrey!important;
  2. font-weightbold;
  3. font-size12px;

Saturday, 7 October 2017

Adding Subheaders to reports the easy way

After publishing this plug-in I found out that this functionality is native in Apex. Read more details here.

For an assignment I was working on a page containing a list of dates with the amount of sunlight on that day. This produces a long list of dates with numbers which I think is not very accessible. I applied my Report2columns plug-in which already improved the layout, but I still was not satisfied:


It are still a lot of numbers with little structure. Especially the repetition of the month and year adds a lot of characters, but adds little meaning.

After some experimenting with bold fonts and grey colors I came up with the solution to use subheaders for the months. And suddenly the data made much more sense to me:


This was done by adding an extra column with the subheader text to the report. In a After Refresh  dynamic action a JavaScript function scans the table and adds a subheader at each location where the content of the subheader column differs from the previous row.

In addition to the sub headers the month and year indicators are displayed in grey. This way they have less effect  on the general picture, but they are still readable: you do not have to shift your attention to the sub header to know the month and year of the date. This effect was accomplished by adding the formatting in the query:

SELECT to_char(lgr_date,'dd')
||'<span style="color: lightgrey;">'
||to_char(lgr_date,'-mm-yyyy')||'</span>' AS thedate
FROM mytable

Plug-in for subheaders

I was so enthousiastic about the effect of the subheaders that I have created a plug-in to generate subheaders in a Classic report.

The Report Subheaders plug-in is very easy to use. All you have to do is:
  • import the plug-in ( you can download it from Apex.world )
  • add a column to your query which contains you subheader content
  • create an After Refresh dynamic action on your report
  • add a true action with a call to the Report Subheaders plug-in
  • fill in the name of your subheader column in the Subheader Column attribute
  • if you want to have your table headings repeated after each subheader, set Repeat Subheaders to Yes
  • The default formatting of the subheaders can be changed by defining the class td.t-Report-cell.subheader.Note that the background-color has to be defined with !important.
You can see the plug-in in action here on my demo site:


Happy Apexing :-)


Sunday, 10 September 2017

ORA-00933 when editing a Apex report

Have you encountered this error before in working with Apex? I do regularly wen editing reports.
At first I have created a nice report. After getting the query right I make some columns invisible, change the header texts and do some formatting.
Then I run the report and it looks nice. No errors on the SQL.

Then I apply a few changes and suddenly the report will not show up anymore. Instead I get this ugly error message:

failed to parse SQL query:
ORA-00933: SQL command not properly ended

What happend? It took me some time to figure it out. In my case there was an order by in the report query. This means that none of the report columns may be sortable.
At first this was the case. But one column was changed from Hidden to Plain Text. And in this change the Sortable attribute was set to Yes:


And Apex gets confused when a report query has an order by and an item is also sortable. So the query Apex creates has an incorrect syntax, hence the error message.

Setting the sortable attribute of the item to No immediately solves the problem. The report executes again without any error message.

Happy Apexing...


Sunday, 3 September 2017

Adding a bit of Excel to tabular forms

When speaking to users they often ask me whether the editing of data can be like Excel. Using tabular forms is a long way from using Excel. It is hard to operate the tabular form just with the keyboard and copying of values needs to be done in a number of keystrokes.

With this in my mind I created a JavaScript function to perform a (single) copyDown action. The value of an item is copied to the item below and the focus is set to that item. When this can be executed using a key(combination) the user is able to do a fast copy down action.
After creating this function I realized it also can be used to move up and down in the tabular form using the arrow keys. And I decided to create a Plug-In around it.


The Plug-In can be called from a Page Load dynamic action. No settings are needed.
The actions will execute on any text, date, and select item in a tabular form. Checkboxes are not yet supported.
The available function keys are:

  • [Up] move up to previous row
  • [Down] move down to next row
  • [Ctrl] + [Down] copy content of current cell to cell below and set focus to this cell
  • [Ctrl] + [Up] copy content of current cell to cell above and set focus to this cell
  • [Ctrl] + [Shift] + [C] copy content of current cell to cell below and set focus to this cell ( needed for Select items because they have another function for [Down] )
I could have included the [Right] and [Left] arrow keys but then the editing of the cell content would be affected. These keys cannot be used anymore to navigate within the content. So the keys [Tab] and [Shift][Tab] can be used to go to the next and previous item in the row.

I think many of you can make your users even happier with their Apex application when implementing this Plug-In in your application.

You can see and experience the Plug-In at this demo page: http://www.speech2form.com/ords/f?p=141:copydown

As always this plugin can be downloaded from apex.world.

One last question: does anyone know how to access the state of checkboxes in an Universal Theme tabular form?

Happy Apexing


Friday, 1 September 2017

Copy hidden items to clipboard plugin

At the beginning of 2017 I published a plugin to copy the content of Apex items to the clipboard. I use it on a regular basis in my applications but always for visible elements.
Yesterday I got a comment that the plugin does not handle hidden Apex items correctly. So I set out to create a new version of the plug-in.

In the new version of the plug-in the hidden Apex items are handled correctly and also added support for JQuery selectors.

The new version 1.1 now supports Apex items of type Hidden. This means you can build a string in  hidden item and provide the user with a button to copy the content to the clipboard. Just create a button, add a Click dynamic action to it and supply as action Copy to clipboard [Plug-In]:


In this example the hidden item is called P800_HIDDEN_1.

For the developers that feel at home with JQuery there is the option to reference to DOM elements using JQuery selectors. On the example page you will see a button Introduction to clipboard (JQuery selector) in the header of the Introduction. This button fires the following dynamic action:


The Introduction region has got a static ID INTRO and if you open the inspector you will see that the introduction text is contained in a div element with class t-Region-body. So if you click on the button the text will be copied to the clipboard.
NB Only the first element from the JQuery selection will be used

You can download the new version on http://apex.world

Happy Apexing

Tuesday, 4 July 2017

Restricting shuttle choices even faster

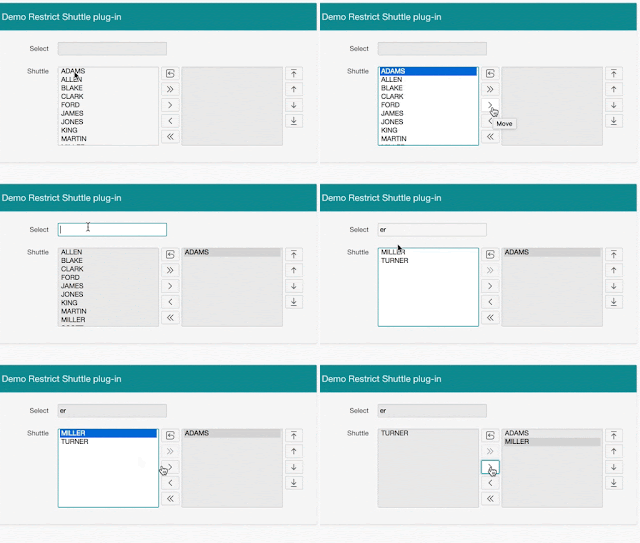
Some months ago I published an Oracle Apex plugin to restrict the left side shuttle choices. You can read the original post here.
On the demo page the On Change event was used to refresh the left side list. My friend Alex Nuijten made the remark this was not very intuitive. The user needs to navigate out of the selection item to see the change.
So I changed the demo page to provide instant feedback. The selection is now refreshed after each keystroke. As this process is completely executed on the client the response is very fast. Only for very long list the user might notice a slight delay.
No changes to the plugin were needed. It can still be downloaded at apex.world


Here is how is was done:

Selection item
Name : P400_SELECTION
Type: Text Field

Dynamic Action
Name: Select on keystroke
Event: Key Release
Selection Type : Item
Item(s): P400_SELECTION

True Action
Name: Perform Selection
Action: Restrict Shuttle Values [plug-in]
Search Item: P400_SELECTION
Selection Type: Item(s)
Item(s): P400_SHUTTLE
Fire on initialization: No

Update 22-07-2017: A new version 1.2 has been released with a bug fix.This bug prevented the plug-in form functioning. 

Happy Apexing


Wednesday, 28 June 2017

Avoiding multiple logins from external Apex links Part 2

A few weeks ago I wrote a post how to avoid multiple logins when using a link in an email. This solution however does not work in a batch process for two reasons:
  • the URL needs to be fully specified, so protocol, server, port and directory are also needed. These data are not available outside the Apex context
  • the function apex_util.prepare_url can only be called from within an Apex session
My first idea was to prepare the URL for every possible mail while being in an Apex session and store it in the database. The stored URL can be used when generating the email.
This would be technically  complex, because a new column would have to be created and the content of this column would have to be kept up to date all the time.

Another possibility would be to create a fake Apex session within the batch process. Then the rest of the code need not be changed. Martin Giffy d'Souza provides a way to create an Apex session in this blogpost. Although this is an 5 year old post I was able to create an Apex session and generate a valid link.

The last solution was chosen because of the simplicity and the absence of need for code change.

Happy Apexing!

Wednesday, 21 June 2017

Debugging causes Oracle Apex page with plugin to crash


Today I was presented with mysterious behavior from an Apex page. I had developed a dashboard in one application and transferred it to another application connected to the same Oracle schema.
When I ran the page it gave the error:
Error in PLSQL code raised during plug-in processing.
ORA-06502: PL/SQL: numeric or value error: character string buffer too small

The error back trace did not give much info:

ORA-06512: at "APEX_050100.WWV_FLOW_DEBUG", line 561
ORA-06512: at "APEX_050100.WWV_FLOW_DEBUG", line 985
ORA-06512: at "APEX_050100.WWV_FLOW_DEBUG", line 355
ORA-06512: at "APEX_050100.WWV_FLOW_DYNAMIC_EXEC", line 165
ORA-06512: at "APEX_050100.WWV_FLOW_DYNAMIC_EXEC", line 1855
ORA-06512: at "APEX_050100.WWV_FLOW_DYNAMIC_EXEC", line 1894
ORA-06512: at "APEX_050100.WWV_FLOW_DYNAMIC_EXEC", line 935
ORA-06512: at "APEX_050100.WWV_FLOW_PLUGIN", line 1296
What was the matter?
I added an exception handler to the render function of the plugin, but no errors were reported from there.
I added a debug statement at the beginning of the render function and there was no output from it in the debug log.
I studied the case with my colleague Alex Nuijten and we could not find a solution. Until he had the bright idea to run the page not in debug mode. And the plugin rendered without errors! Thanks, Alex.

Now everything fell into place. The debugging outputs the PL/SQL Code section of the plugin.
And this code was not fully shown until the last end statement. So the error was generated because the amount of PL/SQL code was too much to output when debugging :-( . The code was 21K long in total and up to about 16K was shown in the output.

This provides yet another reason to move the PL/SQL code of a plugin to a database package.

Happy Apexing

Monday, 12 June 2017

Avoiding multiple logins from external Apex links

Some Apex applications sends notifications emails to users when tasks are due. These emails contain a link to an Apex page. When the user clicks on the link he is taken to the page. When this page is not public - which usually is the case - he is directed to the login page of the application. Even when he is logged in for the same browser on another tab.
When users get a lot of these emails it is annoying they have to log in each time. Apex provides a way to avoid the login when a session exists in the same browser. This post describes how you can set it up using the Rejoin Sessions functionality.

In order to be able to rejoin an existing session a few settings have to be made. 

The instance setting Rejoin sessions needs to be set to Enabled for All sessions. Log in as Instance Administrator and navigate to Manage Instance > Security  


The application setting Rejoin sessions needs to be set to Enabled for All sessions. As a developer go to Shared Components > Security Attributes > Session Management :


After setting this parameter you may be prompted to set the parameter Embed in frames to Deny or Allow from same Origin

The link in the email usually contains parameters. Links with parameters should contain a checksum for session rejoining. So on the target page set Page Access Protection to Arguments must have checksum. Then provide the link URL with a checksum:

l_url := apex_util.prepare_url(l_url);

Use this URL in the notification email to your users. 
When the user clicks on the link and there is no session in the browser he is prompted to login. 
When the user clicks on the link and there is a session in the browser the target page is shown with the parameters from the URL. The user does not need to login a second time. 

This method does not imply a security risk because an existing session is reused. When the user is not logged in the login page will be presented. 

In this example the parameter names and values are exposed in the URL. To maximize the security these might be hidden by storing the actual URL in a table indexed with a hash value. The link in the email points to an intermediate page that uses the hash value to retrieve the actual URL and redirect to it. 

Happy Apexing


Friday, 28 April 2017

Displaying info cards using an Oracle Apex named report template

For the Apex Dashboard Competition of the DOAG in 2016 I created a Apex dashboard. You can read about it in this post
One of the elements of this dashboard was a group of four infocards.


These cards display the key values for a country on a certain subject. Apart from the text the cards differ in color and the icon used.
These cards are created using a named report template. This is a special kind of report template. Using a normal report template the query columns and rows map to the columns and rows in a HTML table. A named report template consists of a HTML template in which the query columns are referenced by name. For the infocards the query and template below are combined:

select 'Population'  title
     , population    data
     , 'Number of inhabitants'  text
     , 'fa-users'   as  icon_class
     , 'db2_red'     as  container_class
from   cnt

Row Template 1 within the Report Template:


The substitution strings in the template are replaced with the corresponding values from the query.
As you can see the column values can also be used to define CSS classes as in the enclosing DIV element. The value of the column container_class defines the name of the class to applied. This class defines the color of the card. The class icon_class defines the Font Awesome icon to be used.

The cards are styled with the following CSS:


The color of the card can be defined by selecting the db2_color class as container_class in the query. 

The icon is positioned absolute relative to the card with the class db2_icon_container. Space is created for the icon container by defining  left:80px; for the main DIV containing the text.

The rest is quite straight forward CSS styling.


You can create your own Named Report Template:
- navigate to Shared Components > Templates
- press Create
- chose Report
- create the template From Scratch
- enter the name for your template and check Named Column (row template)
- then enter the HTML for the template

Named Report Templates provides us developers with more freedom to style the output. The downside is that the templates are more specific and less widely applicable. 

Happy Apexing

Tuesday, 18 April 2017

Oracle Apex Plug-in for restricting shuttle choices

The Oracle Apex shuttle item is a neat way to select a number of values. It is however not so user friendly when the list of choices is very long. In this case it is useful to be able to limit the list of choices.
When you implement the limitation in the LOV-query of the item, the limitation will also be applied to the selected values. Usually this is not the desired behavior.
This behavior is avoided when the restricting of the left shuttle pane using JavaScript. I have created a Dynamic Action plug-in to do this. The choices in the left shuttle pane are evaluated case insensitive against the content of the search item. If the search item contains more than one string ( separated by spaces) all the strings should occur in the shuttle value. The search string 'INVOICE 2013' returns only values that contain 'INVOICE' (independent of case) and '2013'.


The plugin attributes are the shuttle item and the select item. The plugin needs to know the select item to disable submit when enter is pressed.
Furthermore the select all button is disabled once a selection is applied because this button copies everything from left to right irrespective of visibility. Once no selection is applied the button is activated again.

You can see the plug-in in action on:

http://www.speech2form.com/ords/f?p=OPFG:RESTRICT_SHUTTLE

As usually you can find the plugin on apex.world

Update 22-04-2017: A new version has been released with support for Safari and IE. Also the triggering item is not anymore restricted to the search item. 

Update 22-06-2017: In a new blogpost I describe a way to have direct filtering after each keystroke: https://dickdral.blogspot.nl/2017/07/restricting-shuttle-choices-even-faster.html

Update 22-07-2017: A new version 1.2 has been released with a bug fix.This bug prevented the plug-in form functioning. 

Happy apexing

Sunday, 9 April 2017

Finding slow JavaScript

Working with Apex I regularly write Javascript. Most of the time these client-side code snippet are blazing fast, but in some cases they take a few seconds to execute.

In these cases I want to see which part of the code is slow. In this process I use two very simple JS functions which make life a lot easier for me:

var timing_start;

function start_timing( text) {
    timing_start = performance.now();
    if ( text) { console.log('Start timing:'+text); } 
}

function show_timing(text)
{ console.log('Timing:'+text+', milliseconds:'+ (performance.now()-timing_start) );  }

You can put this code on the page or include it in a general JS file.

 The use of these functions is really simple:

start_timing();
...
code to be timed 
...
show_timing('Data retrieved');

This will result in the following output in the browser's console:


Timing:Data retrieved, milliseconds:784.2350000000001

The show timing calls display the elapsed time since the last call to start_timing.

Happy JavaScripting

Monday, 6 February 2017

Generate log statements in seconds

One of the things that cost me a lot of time is the writing of log statements.
I do it a lot when I am working on complex PL/SQL or JavaScript routines. Just to understand what's happening. Mostly these log statements have the form:

logger.log('varname1='||varname1||', varname2='||varname2, etc... );

and most of the time the variable names are even longer :-(. 
So it is a lot of typing, especially for something that is deleted after a few hours. As I am into automating my job I decided to automate it. Here you can see it in action: 


The selection and generation is all written in JavaScript. You can see how fast it works ( it is recorded in real time ). The code is pasted in the textarea, variables are selected by clicking and then the log statement(s) can be generated. 

You can find the page here:

http://www.speech2form.com/ords/f?p=OPFG:GEN_LOG_STMT

The page supports PL/SQL and JavaScript. For PL/SQL the identifier naming rules are quite strict, so these are implemented. At the moment the same rules are also applied to JavaScript. 
NB As JavaScript rules are very free, some variables might not be recognized, for example when they contain diacritics.

For PL/SQL you can select logger or apex_debug, for JavaScript console.log statements are generated. 
There is an option to generate mulitple calls or combine all variables in one call. 

I have tested this with PL/SQL and JavaScript and I could run the generated code as is, no changes were needed. 

Happy Apexing and JavasScripting

Wednesday, 1 February 2017

Using Heatmap Plugin to monitor site visits

As my demo site grows I am curious about my visitors. Based on the Apex activity log I have created a report which shows the origin of the visitors:


The location is determined from the IP address. This is done in a Dynamic Action that calls a web service at ipapi.co to retrieve the geographical location from the IP address and then stores the result into an Oracle table for subsequent usage.

NB The apex_activity_log is limited in size and the older entries are regularly deleted. Therefore the content of the log is daily copied to a another table. This table is used for the report and the map.

I like to see that the visitors come from all over the world, not only from Europe, North America and Asia, but also from Middle and South America and Africa.
It is good to see that Apex is used all over the globe!

But the list does not give me an overview of the geographical locations. So I looked for a way to visualize this data and came across the GeoHeatMap plugin by Jeffrey Kemp. It is very easy to implement and just requires a query retrieving latitude, longitude and weight.

The result is a very nice looking map:


You can get a clear view of where the visitors come from.

In the normal mode the light green color is hardly visible against the predominantly green color of the maps. By setting the plugin attribute Map Style to mostly gray, found at  https://snazzymaps.com/style/4183/mostly-grayscale, you get the quiet background with sufficient contrast.

You can see the result at:

http://www.speech2form.com/ords/f?p=141:HEATMAP

It is possible to see the geographical distribution per page by changing the Page select list. There is clear difference in distribution for the various pages of the application.

Happy apexing

Sunday, 29 January 2017

Utility for Rewriting query parameters

Last month I have worked a lot with charts in Apex. As it was a BI application on research data the queries were long and contained many input parameters.
Starting in Apex I used bind variables to reference the input items.

select name from table where id = :P100_ID

Then I move the query to a package and I had to rewrite the bind variables to calls of the Apex v function.

select name from table where id = v('P100_ID')

For some queries I preferred to pass the parameters as PL/SQL procedure parameters so I had to change the query to:

select name from table where id = p_id

And for defining a ref cursor I prefer to use substitution parameters:

select name from table where id = [id]

Now this is just a short query with just one parameter.
But it is a lot of work for queries with  20+ lines with 5+ parameters.

And then it takes time to convert the parameters. And I make mistakes, I forget to change a parameter or I make a typo. Most of the time I find the error quite fast but sometimes it is not so obvious.

Enough reasons for me to automate this process. And make the solution publicly available:

http://www.speech2form.com/ords/f?p=OPFG:QUERY_VARIABLES


On the page you can paste your query. If possible the source parameter type is recognized.

You can indicate to what type of parameters are the target of the conversion.
Further you need to specify the delimiters for the substitution variables or the prefixes for PL/SQL and Apex ( for bind variables and v-function).

Then hit Generate, clip the code and use it.
For me most of the time I can use the code without modification.

Happy apexing...


Friday, 20 January 2017

Generating setters and getters for package variables

Building applications with Apex I am coding in PL/SQL a lot. I find myself typing in similar patterns many times. And I do not like it. Being an IT man I look for ways to automate it.

 One of the things I regularly have to create is getters and setters for package variables. I start out with a package and define a package variable. Then after a while it turns out I need this value in a SQL statement. So I need a getter. It is more elegant to use getters and setters anyway.

But my point is I always end up typing more or less the same code and it slows me down. So I created another generator. You can find it at:

http://www.speech2form.com/ords/f?p=OPFG:CREATE_GETSET

It is very simple and fast to use. Just type (or paste ;-) ) the name of the variable, chose the datatype and hit the generate button. Then hit Copy to Clipboard and paste the result in your PL/SQL package specification and body code respectively.


Extra parameters:
- Internal variable name: use it if the internal variable name differs from the one you want to expose in the interface. The case of this name is not affected by the Case switch.
- Case of keywords: you can have your code with uppercase keywords

Happy Apexing

Friday, 13 January 2017

Plug-in for time input for touch devices

In februari 2015 I published a blogpost about a new form of time entry on smart phones. Now I have wrapped this control into an Apex plug-in. 

The essence of the control is that you draw the hands of the clock on your smartphone instead of  entering or choosing the time in digital format.
In my experience it feels much more intuitive. It is also very fast way for entering time values. 


The next link will take you to a page where you can try this control.

http://www.speech2form.com/ords/f?p=opfg:time_input_demo

The control is designed for touch devices. In a desktop browser you can click on the numbers in the analog clock to select the hours or minutes.

If you want to try the control on your phone or tablet you can have an email with a link to the demo page sent to you. Enter your email address below and press the 'Send link by mail'. Your mail client will open and you can send the mail.

Send to email address     Send link by mail
( Your email address is not stored )


How to use the control

Below is an explanation of the control:

  • Touch the clock image next to the time input field and the time input control will appear.
  • In the center is the analog clock in which the hands can be drawn. 
  • Above it you see the digital time with buttons for changing to AM or PM. 
  • Below it are buttons to Accept of Cancel. 
  • You can draw a hand by moving your finger from (approx.) the center of the clock outward toward one of the numbers. 
  • The accuracy of the clock is 5 minutes
  • The active hand and the active part of the digital display are indicated by a red color
To enter 10:15 you start at the center of the clock and swipe towards the 10, then release.
The hour in the digital time display above the clock will display 10 and the minutes will have turned red (=active). Then start in the center of the clock again moving toward the 3 this time. When you release you will notice that the digital clock displays 10:15.
The time is initially interpreted as a value between 7:00 and 19:00.
To change to PM touch the PM button.
If you are satisfied you can press OK to save the time. Cancel returns to the form without saving the time.

Apex Plug-in

This control is now available as an Apex dynamic action plug-in.
You can find it at the plug-in section of apex.world.

The settings of the plug-in allow you to:
- define the output time format ( application attribute )
- define the default time window base ( component attribute), see explanation below

Using a default time window

The analog displays a 12 hour period, while the day consists of 24 hours. This is tackled by the AM/PM indicator. It is however not very user friendly if you have to press the PM button each time you want to enter a time after noon. Therefore the concept of a time window is introduced. In many cases your application will accept times in a certain ranges. For working hours registration this might be between 7:00 and 19:00.
It is possible to interpret the chosen times to that specific period. So hour=8 will yield 8:00 and hour=5 will result in 17:00. In this example the time window is from 7:00 to 19:00 and the time window base is 7.

The time window base can be set as component level attribute. The user can overrule this setting by using the AM or PM buttons. So if the user enter hours=5 and presses the button AM, the resulting time will be 5:00.

I would really like to hear whether you think this control useful. Or maybe you have  suggestions on improving it.

Happy developing,

Tuesday, 10 January 2017

Plug-in for copying to clipboard

It is a hobby of mine to generate code. I use Apex as a shell to enter the parameters and display the result. Usually the result is a text area in which the code is contained. After generating the text I can select the code and copy the result to the clipboard. But I want it to be a bit more comfortable.

So this is why I developed this plug-in. It is a dynamic action plug-in that you can use in any DA, but usually it will be a DA fired from a button. It is used in the page to generate substitution code:


Implementing this functionality is as easy as importing the plug-in and call it in the dynamic action behind the click on the button. Select the item of which the content should be copied and you are off to go:


You can see this plug-in in action on the demo page for this plug-in.

You can find the plug-in on apex.world.

Happy Apexing!

Sunday, 8 January 2017

Plug-in for resizing modal dialogs

Some weeks ago I wrote about automatic resizing of modal dialog to fit the content. Since then my new hobby is Apex plug-in development, so I decided to create a plug-in for this. The plug-in works on Apex 5.0 and 5.1.

New resizing functionality for modal dialogs in Apex 5.1

In reaction to my previous post Shakeeb Rahman tweeted that the resizing was on of his favorite features of UT in Apex 5.1. After getting Apex 5.1 this was of course one of the first things for me to investigate. At first nothing happened, then I realised that the compatibility probably should be set to 5.1 in the Application properties:


And then the modal was indeed resized on load. But not always as I expected, as you see on the demo page http://www.speech2form.com/ords/f?p=opfg:resize_dialog. On this page you can de-activate the plug-in. The application is set to Compatibility 5.1, so you can observe the new behavior. 
The report scales all right, but the dialog with the form items does not. It may be a timing issue, in that the display of the items happens after the setting of the height. 
So on Apex 5.1 the plug-in extends the new resizing functionality. 

The plug-in

Anyway, the Resize Dialog plug-in gives you control over the moment and the way of resizing. 
It is a Dynamic Action plug-in that can be called at Page Load or as in the example below on After Refresh for a report. The plug-in works on Apex 5.0 and Apex 5.1. 

Apart from resizing the plug-in also:
- guards the dialog from running of the page
- enables to define margins around the modal dialog
- enables vertical centering of the dialog

The margin size and the enabling of centering can be set with custom attributes. 


The plug-in can be downloaded on http://apex.world.

Happy Apexing

Sunday, 1 January 2017

Plug-in for Splitting reports into columns

In November I posted about splitting an Apex Report into multiple columns. This solution involved some JavaScript code to be included and called from the Apex page.

One of the comments I got was a question whether the items could also be sorted horizontally. With a small number of rows the current code can result in less columns than specified. I decided to implement this feature:


I also realized that creating a plug-in would make it much easier to implement this functionality. No need to add JS code, call this code at some point and figure out the right value for the parameters...

So here is my first (public) plug-in, Report2columns.
The easiest way to get the plug-in is om the Plug-ins page of  apex.world:


To use it:
  • import the plug-in 
  • create an After Refresh trigger for your report 
  • chose the action report2columns [Plug-In] 
  • enter the number of columns and the sorting direction
That's all there is to it.

 Happy Apexing