Wednesday, 30 November 2016

Stop typing and generate you substitution code

Some years ago I attended a presentation of John Scott in which he demonstrated the use of substitution for producing a string from a number of variables.

Up to that moment I used concatenation for generating strings from variables:

l_html &nbsp;:= '<input id="'||l_id||'" onclick="test('''||l_value||''')" type="text" />';  

Even a relative simple expression like this is hard to read. Moreover it is not easy to see whether the quotes are placed at the right position and quantity.

So John's solution to this is to start with a string with delimited placeholders and replacing the placeholders with their value one by one. So the code gets:

l_html := q'!<input id="#ID#" onclick="test('#VALUE#')" type="text" />!';  
l_html := replace(l_html,'#ID#',l_id);  
l_html := replace(l_html,'#VALUE#',l_value);  

This code is much more readable and the html can be checked easily.
I have been using this design pattern a lot since then.

But the typing annoys me. Typically something to automate! So this morning, when I was getting ready to type a list of replace statements for the 1001st time I decided to create a small tool to generate these lines.


Paste the string with placeholders into the form and change the other parameters to your preferences. Press generate and you can copy the resulting code into your PL/SQL.
The generation presumes that the names of the variables containing the values to be replaced are equal to the placeholder names. Doing this also improves the readability of the code.

The utility can be used online at http://www.speech2form.com/ords/f?p=141:600

Happy apexing!

Wednesday, 23 November 2016

Wrestling with session state

Today I was asked to implement change detection in an Apex page. This page used a custom PL/SQL process instead of the standard Apex transaction processing. In this setup users can overwrite each others transaction. This can be fixed by calculating a checksum over the queried items and comparing that to a checksum on the same items before applying the changes. If the checksums are equal, no one else has changed these items, otherwise the current user should be warned.

I decided to create a checksum item P200_CHECKSUM at the top of the page. The page contained a dynamic form that was generated in a PL/SQL region. In order to preserve performance I added the checksum calculation to the PL/SQL region. The resulting checksum was written to :P200_CHECKSUM in session state. With PL/SQL code at the beginning of the save process the checksum was checked.

But it did not work! The checksum was calculated and I could see the value with Show session. But debugging showed that the checksum used in the save process was empty. It took me a while to figure out what was happening.

It was all about rendering order:
- at first the P200_CHECKSUM item was rendered with value null
- then the checksum was calculated and put into session state

At submit the value of P200_CHECKSUM in session state was updated with the value from the page (which was null). This is why the value of P200_CHECKSUM was empty in the save process.

Once I understood this the solution was easy: just put the P200_CHECKSUM item in a region that is rendered after the calculation.

An alternative solution is to use a PL/SQL Dynamic Action with the P200_CHECKSUM in the Page items to return. The PL/SQL code can be null;. The DA fills the value of the page item P200_CHECKSUM with the value in session state. Drawbacks of this solution are extra network traffic and a slight delay in the setting of the value.

Experiment

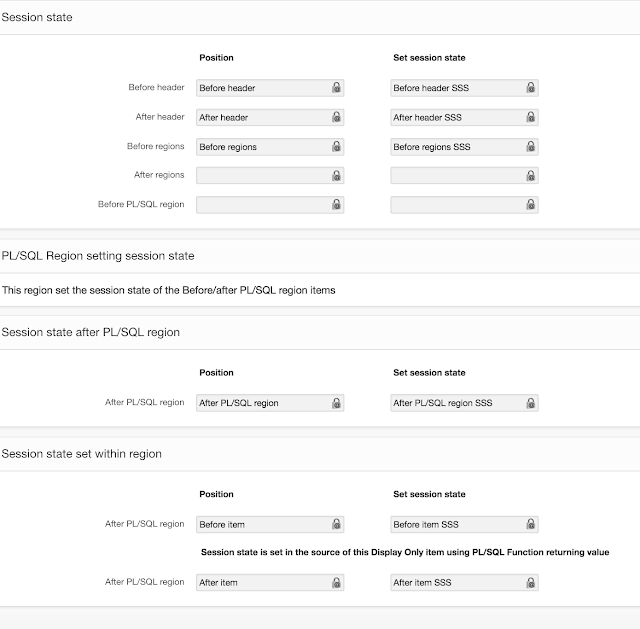
The above led me to set up an experiment on session state and items rendered. The session state is set at several process points, with items showing the result on the page. Session state is set by either using bind variable notation or with apex_util.set_session_state.
The image below comprises the result after the page is run.


Several conclusions can be drawn:
- there is no difference between using bind variables and set_session_state
- from the normal Apex process points only the value set After Region is not rendered
- as expected from my experience the item set in the PL/SQL procedure is only rendered after the procedure has run
- the session state set in a display item is also available in previous items. The debug listing shows that the query for populating the display item is executed before the regions.

Happy apexing!


Tuesday, 15 November 2016

Disabling Apex items the right way

Sometimes you want to show data without the user being able to change it. The easiest way in Apex to use reports and read only items. There are use cases however for which this is not good enough.
For example when you want to change from read only to editable item dynamically or vv. Or if you want to disable items in a tabular form selectively.
In these cases it is necessary to generate the editable items and to disable them afterwards. In this blogpost you can read how you can do this without compromising the functioning of your page. A special chapter describes the way to selectively disable items in a tabular form.

How to disable items correctly with JavaScript

If you want to disable items, the two most obvious options are the HTML attributes disabled and readonly. But these both have their shortcomings: disabled hides the item and its content from the form and readonly only applies to text inputs and textarea's.

The attribute disabled is the most dangerous one to use. If you disable one input item on line 1 in a tabular form all the cells below shift one place up. Look at this example of a tabular form on the EMP table. On the right is the starting situation. The first item of Commission is disabled. To the right you see the result after saving. All the values have shifted up one place! So the data has been transferred to other records! Ward is a lucky guy now and Martin is left with no commission. Pretty scary, isn't it?


The success message indicates exactly what happened, 4 rows have been changed. 

So disabled is dangerous to use and readonly is limited in item types.

Luckily we have the class apex_disabled that can be used to disable all types of items. This class uses the css property pointer-events that prevents any mouse action. It also takes care that the item looks not editable (grey background etc. ).
This class does however not prevent the user from navigating to the item with keyboard navigation, i.e. with the Tab key. This can be prevented by applying the attribute tabindex="-1"

So the correct way to disable an item is applying the class apex_disabled and the attribute tabindex="-1". It takes care that the item cannot be reached by the user either by mouse or by keyboard.

function disable_item ( itemName )  
{ 
   $('#'+itemName).addClass('apex_disabled').attr('tabindex','-1');    
}
function enable_item ( itemName )  
{ 
   $('#'+itemName).removeClass('apex_disabled').removeAttr('tabindex');    
}

NB To be sure the application always has to perform a server side check on autorisation because the item values can easily be manipulated using a browser inspector. 

How to selectively disable items in a tabular form

If you want to disable items selectively meaning specific rows or cells you have two options: 

1. generate the tabular form yourself using apex_item and create readonly items when applicable
2. use an Apex tabular form and disable the items using JavaScript

The first option takes a lot of coding and is hard to maintain. You will soon get a big query which combines data and logic. 

The second option delivers much clearer code and you can style the items the Apex way. The only thing you need to do is to supply Apex with the items that need to be read only for each row. It should take the form of a delimited list of column names (equal to the ones in Apex). You can code that into your query or use a function supply the list.
An attribute data-item="DISABLE_ITEMS" is  added to the column containing this list in order to find the data. 

In the after refresh Dynamic Action JavaScript is used to loop along all the rows and perform the disabling of the items. You can use the code below:

function disable_tabform_items ( tabSelector )  
{ 
    // loop along all the rows with a DISABLE_ITEMS cell
    $(tabSelector).find('[data-item="DISABLE_ITEMS"]').each( 
      function() 
    {
      // make array of item names to be disabled
      list = $(this).val().split(':');
      if ( list.length > 0 ) 
      { 
        // identify the row
        var tr = $(this).closest('tr');

        // disable all the item in the list  
        for ( i=0 ; i < list.length ; i++ ) 
        {
          $(tr).find('[headers="'+list[i]+'"]')
               .find('input,textarea,select,button.ui-datepicker-trigger,a.a-Button--popupLOV')
               .addClass('apex_disabled')
               .attr('tabindex','-1');
        }       
      }
    });
}
An example of this you can find in action here.
There you can also download the demo application in order to see how it works form the inside.

Happy apexing!

06-09-2017:  The code of disable_tabform_items is changed to also support Popup LOVs

Friday, 11 November 2016

Splitting reports into columns revisited

Two years ago I wrote a blog post about splitting a long not wide report into several columns as in the image below.
That post was based on Theme 25. Lately I got a question about support for Universal Theme. So I created a more generic version of the JQeury code that copies the styling of the existing table:
function reportToColumns ( tabSelector, numCols )  
{ var numRows  = 0;  
  var curtable = null;
  // calculate the number of rows per column
  var table = $(tabSelector).addClass('reportColumn'); 
  var rowsPerCol = Math.ceil( ( $(table).find(' tr').length-1 )/numCols);  
  var baseName = 'reportColumn';   
  
  // create table template for columns 
  var template = $(table).clone();
  $(template).find('tr').has('td').remove();
  

  for ( i = 2; i <= numCols; i++)  
  {  curtable = $(template).clone().attr('id',baseName+i).appendTo( $(table).parent() );
     rows = $(table).find('tr').has('td').slice( rowsPerCol, 2*rowsPerCol).detach();
     $(curtable).find('tbody').append(rows);
  }
}

The parameter tabSelector should contain the JQuery selector of the table containing the report.
For Universal Theme this is:

'#report_report static id table.t-Report-report'

in which the report static id should be replaced by the static ID defined for your report region. Actually this code can be used for any HTML table. You can find the table selector using FireBug or Chrome Inspector.
I personally like to work with Firebug because of its multiline code pane. It is very easy to test JQuery selectors because the code pane remains unaltered while you can see and scroll the console output. I also use this to develop and test my JavaScript.

Add the class below to your CSS definitions. It makes sure that the columns are displayed next to each other with a distance of 30 px between them.
.reportColumn {
    display: block;
    float: left;
    margin-right: 30px;
    position: relative;
}

You can see it in action here.

Happy Apexing