Monday 26 December 2016

New icons in Apex 5.1

Apex 5.1 ships with a large set of icons. These are contained in a font called Font Apex.
This font contains 1000+ icons. Part of the icons are Font Awesome V4.7 based, others are specifically designed for Apex. The Font Awesome based icons are less bold, as you can see in the menu icons below. Original Font Awesome to the left, Font Apex to the right.


Scaleability

Because the icons are less bold they are more suitable for enlargement. Font Awesome icons look a bit bulky after enlargement, the largest one is 3em:


while Font Apex stays elegant :


Applying Font Apex

You can activate Font Apex in the properties of the theme ( Shared Components > Theme > Specific Theme > Icons ):


The HTML to use Font Apex is exactly the same as with Font Awesome. Font Apex also has the classes .fa and .fa-nameBecause Font Apex is a superset of Font Awesome v4.7 you can toggle between the two font as long as you do not use Font Apex icons.

List of icons

You can find a list of available Icons on this page

There are three categories of icons: 
- Font Awesome based: icons based on Font Awesome 4.7 with the same name
- Apex icons: mostly technical icons
- Emoji's: emoji icons


Friday 23 December 2016

Using APEX_MAIL outside of Apex

Update: This post applies to Oracle schema's that are not assigned to an Apex workspace. When assigned you can use the solution setting the Apex security ID. 

To send mail from your application you can use the package APEX_MAIL. I had created a package to send daily status mails and everything worked fine when called from within the application. So I thought I was almost ready... Then I tried to call the package from SQL Developer :

Error in Send daily mail: ORA-20001: This procedure must be invoked from within an application session.

A Google search quickly revealed the solution. The Apex workspace ID should be set.
Alas, this did not work ( anymore? ).
Update: This solution did not work because the Oracle schema was not asssigned to an Apex workspace.

I did not want to rewrite the logic so I had to figure out a way to call the package from within the Apex context.
It can be done using a public Apex page sending the mail. This page is called from PL/SQL using UTL_HTTP. The use of the page is restricted by using a secret parameter.
Read on to see how it works in detail.

Database

In the database we have a package mail_pck to send the mails. We add the following code to this package:

create or replace package body mail_pck is

  -- autorisation code 
  -- NB do not use special characters for URL's like '?', '&' etc.
  g_aut_code      varchar2(100) := 'secret_string';  
                                  
...

  procedure send_mails_using_apex_mail is
...

  -- return the autorisation code
  function get_aut_code  return varchar2 is
  begin
    return ( g_aut_code ); 
  end;

  -- check the autorisation code
  function check_aut_code ( p_code in varchar2) return boolean is
  begin
    return ( nvl(p_code,'x') = g_aut_code ); 
  end;

  -- calls Apex page from which mail is sent
  procedure batch_send_mails is
    l_url       varchar2(1000) := null;
    l_result    varchar2(4000) := null;
  begin
    l_url    := alg_pck.get_parameter('SERVER_URL')||'/ords/f?p='
                ||alg_pck.get_parameter('APP_ID')
                ||':9000:0::::P9000_CODE:'||get_aut_code;
    l_result := utl_http.request(l_url);
  end;

end mail_pck;


The schema for this package should be granted to execute utl_http.
An ACL should be created to access the Apex server. This ACL should be granted to the schema.

Apex

Create a page in Apex with
Page Number : 9000 ( for this example )
Authentication : Page is public

Create a page item
Name : P9000_CODE
Type: Hidden

Create a branch
This branch fires a redirect when the code is not correct
Name: To login page when code is not valid
Process Point: Before header
Type: Page or URL (Redirect )
Target page: LOGIN_DESKTOP
Condition Type: PL/SQL Expression
PL/SQL Expression: not mail_pck.check_aut_code(:P9000_CODE)


Create a PL/SQL region
This PL/SQL region performs the sending of the mails
Name: Send daily mail
Code:
begin
  mail_pck.send_mails_using_apex_mail;
  sys.htp.p('Mails sent.');
end;
Condition Type: PL/SQL Expression
PL/SQL Expression: mail_pck.check_aut_code(:P9000_CODE)


Happy Apexing!

Thursday 8 December 2016

Automatic resizing of modal dialogs

The modal dialogs are a very nice feature, easy to use and well integrated in the Apex framework. One thing that annoys me is the vertical sizing of the dialog window.
Normally I will create a page as a Modal dialog. When running it I notice that the window is way too high or not high enough. I go back to the builder and enter a number of pixels for the height and look what the result is. I repeat this process a few times until I am satisfied.


When the page is changed this may  change the height of the page, so... :-(.
This is typically one of these boring jobs I like to automate. So I examined the structure of the Apex modal dialog.
One thing that is counter intuitive is that the header of the modal dialog is part of the calling page. Only the red part is generated from the modal dialog page.


The height of the modal window is defined in the calling page. This is the reason why you have to refresh the calling page when you change the height of the modal dialog.

Inside the red square the height is determined by three div elements: dialog header, dialog body and dialog footer.
The JavaScript code below determines the total height of the dialog and sets the height of the determining element on the calling page to this value.

function resize_dialog()
{
  var header  = $('.t-Dialog-header');
  var height  = parseInt($(header).height());  
    
  var body    = $('.t-Dialog-body');
  var padding = parseInt($(body).css('padding-top')) + parseInt($(body).css('padding-bottom'));
  height += padding;
    
  var container = $(body).children().first();
  height   += parseInt($(container).height());  
    
  var footer    = $('.t-Dialog-footer');
  height   += parseInt($(footer).height());  
  console.log('total height = '+ height );

  parent_container = window.parent.$('.ui-dialog-content');
  $(parent_container).height(height);
}


This code can be called in the On page load section of the dialog page.


It is also possible to call the function in a Dynamic Action that changes the height of the dialog content. Two examples of this behavior can be seen in the example page here. You can change the number of rows or number of items and the dialog is resized automatically.

Happy Apexing!


Wednesday 30 November 2016

Stop typing and generate you substitution code

Some years ago I attended a presentation of John Scott in which he demonstrated the use of substitution for producing a string from a number of variables.

Up to that moment I used concatenation for generating strings from variables:

l_html &nbsp;:= '<input id="'||l_id||'" onclick="test('''||l_value||''')" type="text" />';  

Even a relative simple expression like this is hard to read. Moreover it is not easy to see whether the quotes are placed at the right position and quantity.

So John's solution to this is to start with a string with delimited placeholders and replacing the placeholders with their value one by one. So the code gets:

l_html := q'!<input id="#ID#" onclick="test('#VALUE#')" type="text" />!';  
l_html := replace(l_html,'#ID#',l_id);  
l_html := replace(l_html,'#VALUE#',l_value);  

This code is much more readable and the html can be checked easily.
I have been using this design pattern a lot since then.

But the typing annoys me. Typically something to automate! So this morning, when I was getting ready to type a list of replace statements for the 1001st time I decided to create a small tool to generate these lines.


Paste the string with placeholders into the form and change the other parameters to your preferences. Press generate and you can copy the resulting code into your PL/SQL.
The generation presumes that the names of the variables containing the values to be replaced are equal to the placeholder names. Doing this also improves the readability of the code.

The utility can be used online at http://www.speech2form.com/ords/f?p=141:600

Happy apexing!

Wednesday 23 November 2016

Wrestling with session state

Today I was asked to implement change detection in an Apex page. This page used a custom PL/SQL process instead of the standard Apex transaction processing. In this setup users can overwrite each others transaction. This can be fixed by calculating a checksum over the queried items and comparing that to a checksum on the same items before applying the changes. If the checksums are equal, no one else has changed these items, otherwise the current user should be warned.

I decided to create a checksum item P200_CHECKSUM at the top of the page. The page contained a dynamic form that was generated in a PL/SQL region. In order to preserve performance I added the checksum calculation to the PL/SQL region. The resulting checksum was written to :P200_CHECKSUM in session state. With PL/SQL code at the beginning of the save process the checksum was checked.

But it did not work! The checksum was calculated and I could see the value with Show session. But debugging showed that the checksum used in the save process was empty. It took me a while to figure out what was happening.

It was all about rendering order:
- at first the P200_CHECKSUM item was rendered with value null
- then the checksum was calculated and put into session state

At submit the value of P200_CHECKSUM in session state was updated with the value from the page (which was null). This is why the value of P200_CHECKSUM was empty in the save process.

Once I understood this the solution was easy: just put the P200_CHECKSUM item in a region that is rendered after the calculation.

An alternative solution is to use a PL/SQL Dynamic Action with the P200_CHECKSUM in the Page items to return. The PL/SQL code can be null;. The DA fills the value of the page item P200_CHECKSUM with the value in session state. Drawbacks of this solution are extra network traffic and a slight delay in the setting of the value.

Experiment

The above led me to set up an experiment on session state and items rendered. The session state is set at several process points, with items showing the result on the page. Session state is set by either using bind variable notation or with apex_util.set_session_state.
The image below comprises the result after the page is run.


Several conclusions can be drawn:
- there is no difference between using bind variables and set_session_state
- from the normal Apex process points only the value set After Region is not rendered
- as expected from my experience the item set in the PL/SQL procedure is only rendered after the procedure has run
- the session state set in a display item is also available in previous items. The debug listing shows that the query for populating the display item is executed before the regions.

Happy apexing!


Tuesday 15 November 2016

Disabling Apex items the right way

Sometimes you want to show data without the user being able to change it. The easiest way in Apex to use reports and read only items. There are use cases however for which this is not good enough.
For example when you want to change from read only to editable item dynamically or vv. Or if you want to disable items in a tabular form selectively.
In these cases it is necessary to generate the editable items and to disable them afterwards. In this blogpost you can read how you can do this without compromising the functioning of your page. A special chapter describes the way to selectively disable items in a tabular form.

How to disable items correctly with JavaScript

If you want to disable items, the two most obvious options are the HTML attributes disabled and readonly. But these both have their shortcomings: disabled hides the item and its content from the form and readonly only applies to text inputs and textarea's.

The attribute disabled is the most dangerous one to use. If you disable one input item on line 1 in a tabular form all the cells below shift one place up. Look at this example of a tabular form on the EMP table. On the right is the starting situation. The first item of Commission is disabled. To the right you see the result after saving. All the values have shifted up one place! So the data has been transferred to other records! Ward is a lucky guy now and Martin is left with no commission. Pretty scary, isn't it?


The success message indicates exactly what happened, 4 rows have been changed. 

So disabled is dangerous to use and readonly is limited in item types.

Luckily we have the class apex_disabled that can be used to disable all types of items. This class uses the css property pointer-events that prevents any mouse action. It also takes care that the item looks not editable (grey background etc. ).
This class does however not prevent the user from navigating to the item with keyboard navigation, i.e. with the Tab key. This can be prevented by applying the attribute tabindex="-1"

So the correct way to disable an item is applying the class apex_disabled and the attribute tabindex="-1". It takes care that the item cannot be reached by the user either by mouse or by keyboard.

function disable_item ( itemName )  
{ 
   $('#'+itemName).addClass('apex_disabled').attr('tabindex','-1');    
}
function enable_item ( itemName )  
{ 
   $('#'+itemName).removeClass('apex_disabled').removeAttr('tabindex');    
}

NB To be sure the application always has to perform a server side check on autorisation because the item values can easily be manipulated using a browser inspector. 

How to selectively disable items in a tabular form

If you want to disable items selectively meaning specific rows or cells you have two options: 

1. generate the tabular form yourself using apex_item and create readonly items when applicable
2. use an Apex tabular form and disable the items using JavaScript

The first option takes a lot of coding and is hard to maintain. You will soon get a big query which combines data and logic. 

The second option delivers much clearer code and you can style the items the Apex way. The only thing you need to do is to supply Apex with the items that need to be read only for each row. It should take the form of a delimited list of column names (equal to the ones in Apex). You can code that into your query or use a function supply the list.
An attribute data-item="DISABLE_ITEMS" is  added to the column containing this list in order to find the data. 

In the after refresh Dynamic Action JavaScript is used to loop along all the rows and perform the disabling of the items. You can use the code below:

function disable_tabform_items ( tabSelector )  
{ 
    // loop along all the rows with a DISABLE_ITEMS cell
    $(tabSelector).find('[data-item="DISABLE_ITEMS"]').each( 
      function() 
    {
      // make array of item names to be disabled
      list = $(this).val().split(':');
      if ( list.length > 0 ) 
      { 
        // identify the row
        var tr = $(this).closest('tr');

        // disable all the item in the list  
        for ( i=0 ; i < list.length ; i++ ) 
        {
          $(tr).find('[headers="'+list[i]+'"]')
               .find('input,textarea,select,button.ui-datepicker-trigger,a.a-Button--popupLOV')
               .addClass('apex_disabled')
               .attr('tabindex','-1');
        }       
      }
    });
}
An example of this you can find in action here.
There you can also download the demo application in order to see how it works form the inside.

Happy apexing!

06-09-2017:  The code of disable_tabform_items is changed to also support Popup LOVs

Friday 11 November 2016

Splitting reports into columns revisited

Two years ago I wrote a blog post about splitting a long not wide report into several columns as in the image below.
That post was based on Theme 25. Lately I got a question about support for Universal Theme. So I created a more generic version of the JQeury code that copies the styling of the existing table:
function reportToColumns ( tabSelector, numCols )  
{ var numRows  = 0;  
  var curtable = null;
  // calculate the number of rows per column
  var table = $(tabSelector).addClass('reportColumn'); 
  var rowsPerCol = Math.ceil( ( $(table).find(' tr').length-1 )/numCols);  
  var baseName = 'reportColumn';   
  
  // create table template for columns 
  var template = $(table).clone();
  $(template).find('tr').has('td').remove();
  

  for ( i = 2; i <= numCols; i++)  
  {  curtable = $(template).clone().attr('id',baseName+i).appendTo( $(table).parent() );
     rows = $(table).find('tr').has('td').slice( rowsPerCol, 2*rowsPerCol).detach();
     $(curtable).find('tbody').append(rows);
  }
}

The parameter tabSelector should contain the JQuery selector of the table containing the report.
For Universal Theme this is:

'#report_report static id table.t-Report-report'

in which the report static id should be replaced by the static ID defined for your report region. Actually this code can be used for any HTML table. You can find the table selector using FireBug or Chrome Inspector.
I personally like to work with Firebug because of its multiline code pane. It is very easy to test JQuery selectors because the code pane remains unaltered while you can see and scroll the console output. I also use this to develop and test my JavaScript.

Add the class below to your CSS definitions. It makes sure that the columns are displayed next to each other with a distance of 30 px between them.
.reportColumn {
    display: block;
    float: left;
    margin-right: 30px;
    position: relative;
}

You can see it in action here.

Happy Apexing

Tuesday 27 September 2016

Positioning items next to each other

In the Universal Theme in Apex 5 it seems easy to position items next to each other. Just set Start new row to N and the item stays in the same row. However these items are usually very far apart:


You are limited by the columns in the responsive layout.

It is possible to position the items much closer and have much control over their position. For this you need to call JavaScript function with the names of the two columns as parameter:

position_after('P3000_FROM','P3000_TO');

You can download the JavaScript code here.

You can place the JavaScript code in the Javascript > Function and Global Variable Declaration.
Then the function position_after can be called in the Execute when Page Loads section, for each item you want to position.


The JavaScript removes the col-x classes from the input container of the first item and the label and input container of the second item. This class determines the fixed width of the container. Without this class the container’s width is determined by the content, so it fits tightly around the input or the label.
After removing the classes the JavaScript positions the label and input containers of the second item behind the input container of the first item.

The result of applying this function looks much better:


You can decrease the width of the items and they still stay together.


And there is control over the spacing applying left and right margins no the second label container.

#P3000_TO_LABEL {
   margin-left: 20px;
   margin-right: 20px;
}

In the result you see a larger spacing around the label:


The downside of this approach is that the responsive behavior is not optimal. Developing just for desktop this is no problem.
But if you really want a perfect responsiveness on all screen sizes you should stick to the column model of UT.

Happy Apexing


Thursday 15 September 2016

Using nice icons for links

As many people I am used to use the link images that Apex proposes when creating Forms with reports. And I end up with a bit grey images like:

Well, we are all used to it, aren't we?
Now would not it be much nicer if it would look like this:


This fits much better into the Universal Theme.

It is possible and in fact very easy. If you look at the properties of the link column in the report you see:

You just change the Link Text to   and define the class report-icon:

.report-icon { font-size: 1.6em; }

And you are done.
NB You can by the way use any font-awesome icon you want by changing the fa-xxx class. 

And if you want to use these icons in all your reports, you can define them once as a subsitution variable in the application properties:


 ... and use them in all your reports:


Happy Apexing


Sunday 11 September 2016

Displaying large numbers in human readable form

While developing the dashboard for the Apex Dashboard Competition I found the challenge of presenting large numbers in a readable form. If you want to display the population of countries in a report there is China and India with more than 1 billion inhabitants and Tuvalu does not reach 10,000. With a straight forward report it would look like the left image. The application apply of thousands separator improves the readability, but there is still too much detail in the numbers to easily get the meaning. The right image, where the numbers are formatted using size prefixes is much more readable.


You can see this in a useful example in the Apex World Dashboard. Select a country and look at the ranking table.
In Oracle Apex you can implement such formatting in your query, using a PL/SQL function. This solution has several disadadvantages:
  • Column header sorting is impossible because the actual numbers are replace by a character representation
  • Calling a PL/SQL function in a query can degrade performance
  • the readability of your query gets less
The solution is to apply the formatting using JavaScript. This way the query is not affected and the formatting is done after the sorting.
The formatting is implemented in a After Refresh DA on the report in question:
format_numbers_in_table('#report_tablespaces .t-Report-report');
The function formats all the cells with numeric content.
The parameter to the function should be the selector to the HTML table containing the data to be formatted. In this case the UT Standard Region and Standard Report are used with a static ID tablespaces.

If the report contains a large number of columns or some columns should not be formatted the columns to be formatted can be limited by passing an array of column names as the second parameter:
format_numbers_in_table('#report_tablespaces .t-Report-report',['LAND_SURFACE','POPULATION']);
Only the mentioned columns will be formatted.

Store the JavaScript functions on the page or seperately in a file. You can download the code here: Happy Apexing

Displaying large numbers in human readable form

While developing the dashboard for the Apex Dashboard Competition I found the challenge of presenting large numbers in a readable form. If you want to display the population of countries in a report there is China and India with more than 1 billion inhabitants and Tuvalu does not reach 10,000. With a straight forward report it would look like the left image. The application apply of thousands separator improves the readability, but there is still too much detail in the numbers to easily get the meaning. The right image, where the numbers are formatted using size prefixes is much more readable.


You can see this in a useful example in the Apex World Dashboard. Select a country and look at the ranking table.
In Oracle Apex you can implement such formatting in your query, using a PL/SQL function. This solution has several disadadvantages:
  • Column header sorting is impossible because the actual numbers are replace by a character representation
  • Calling a PL/SQL function in a query can degrade performance
  • the readability of your query gets less
The solution is to apply the formatting using JavaScript. This way the query is not affected and the formatting is done after the sorting.
The formatting is implemented in a After Refresh DA on the report in question:
format_numbers_in_table('#report_tablespaces .t-Report-report');
The function formats all the cells with numeric content.
The parameter to the function should be the selector to the HTML table containing the data to be formatted. In this case the UT Standard Region and Standard Report are used with a static ID tablespaces.

If the report contains a large number of columns or some columns should not be formatted the columns to be formatted can be limited by passing an array of column names as the second parameter:
format_numbers_in_table('#report_tablespaces .t-Report-report',['LAND_SURFACE','POPULATION']);
Only the mentioned columns will be formatted.

Store the following JavaScript functions on the page or seperately in a file. You can also download the code here:
/******************************************************
 * Display numbers readable
 *
 **********************/
function display_number(number)
{
  var sizes = [ {"base":1000,"symbol":"K"}
               ,{"base":1000000,"symbol":"M"}
               ,{"base":1000000000,"symbol":"G"}
               ,{"base":1000000000000,"symbol":"T"}
              ];
  
  var display = number.toString();

  if ( !isNaN(number) ) 
  {
    for ( i in sizes )
    {
      if ( number > sizes[i].base ) 
      {
        num1 = number / sizes[i].base;
        if ( num1 < 10 ) { num2 = Math.round(num1*10)/10; }
        else { num2 = Math.round(num1); }
        display = num2 + sizes[i].symbol;
      }
    }
  }

  return(display);
}
    
    
/******************************************************
 * Display numbers readable in table
 *
 **********************/
function format_numbers_in_table( table_selector, column_list)
{
  var table       = $(table_selector)[0];

  for (var rownum = 1, row; row = table.rows[rownum]; rownum++) 
  {
    //iterate through rows
    //rows would be accessed using the "row" variable assigned in the for loop
    for (var colnum = 0, col; col = row.cells[colnum]; colnum++) 
    {
      //iterate through columns
      //columns would be accessed using the "col" variable assigned in the for loop

      // format columns
      if ( col.innerHTML.length > 0 && col.innerHTML != ' ' )
      { 
        // if column list has content only format columns for this list
        var header = col.headers;          
        if ( column_list == null || column_list.indexOf(header) >= 0 )
        {
            col.innerHTML = display_number(col.innerHTML);        
        }
      }
       
    }  
  }
}


Happy Apexing

Monday 27 June 2016

Hidden treasure : Apex 5 Icons

While looking for a suitable icon for an organization item on the login page I examined the collection of Apex icons. The big difference with the Font Awesome icons is that the Apex icons are less heavy. Therefore they are more suitable to enlarge where Font Awesome icons tend to appear bulky over a certain font size.
I looked for the Workspace Icon ( a database cylinder ), but I could not find it. While inspection showed that it was part of the core.min.css. After an hour of searching I looked at the source files in Firebug. There are two versions of this css file, one in the apex_ui folder and one in the app_ui folder.
I have created a page where both collections of icons are listed:


Press the button above to visit the page. You can toggle the list between the standard icons or all the icons.

The icons can be used in HTML by adding the classes a-Icon and the class of the specific icon (the text behind the icon on the page):

<span class="a-Icon icon-find"></span>

The Apex Builder icons can be used by referencing the file apex_icons.css. Put this file on your server or in the static files and reference it on the page with the icons.

Have fun using the icons,
Dick Dral

Monday 30 May 2016

Flag images in Apex reports and select lists

The founder of apex.world, Juergen Schuster, had a question about using flag images in reports and select lists. As I had used flags in my Apex World Dashboard I responded and pointed him to the dashboard. But that was not an answer to the flags in the select list. I did some investigation and the answer was not so easy to find. But I found it in the end :-) and I want to share this solution with you.

Flags in reports

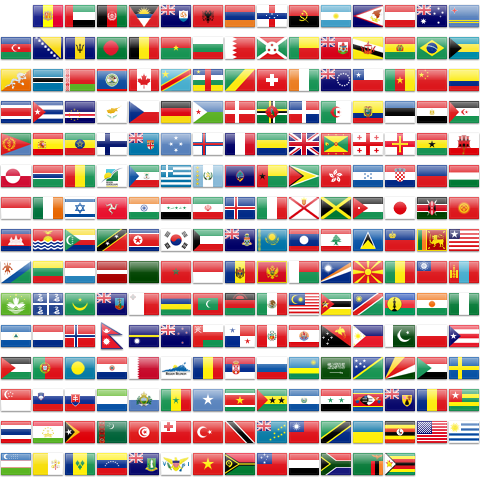
For the use in reports flag sprites are used. The advantage of using sprites is that you only need two files, one css file and one image file. The image file contains one large image with all the flags and in the css each country has a style pointing to the right location on the image file. So the HTML:
<div class=“flag flag-nl”></div>
results in the flag of the Netherlands:

To implement this in Apex you have to load the files flags.css and flags.png and upload them as static files. Refer to the CSS file on your page.
Now all you have to do is create a div in your report with the right country code. In an Oracle Apex report you can select the country code:
select lower(country_code)  as country_code , country_name from countries;
Then in the HTML section of the country_code column paste:
<div class="flag flag-#COUNTRY_CODE#"/>

The text #COUNTRY_CODE# is replaced by the value in the row.
NB This value should be lower case because the class names are in lower case.

This method has been used in the Apex World Dashboard of which a clip of the country report is shown:


Flags in select lists (only Firefox :-( )

The flag in the select list caused me more headaches. The option element is very limited with regard to styling. No child elements are allowed. The only possibility I found was to use an image as background.
Using the sprite technique above poses a problem. The size of the flag is limited by the size of the element. With the standard classes above you will only see the flag and not the rest of the content. When the width is increased, you can see the content but on the background are the other flags (from the one large image).
I looked in vain into Super LOV and select2 plugins for a solution.

So the only solution left was to collect separate flag images and use them as background for the option elements. Luckily you can find a collection of images easily on the internet. The images from http://flagpedia.net are used. With CSS3 these images are bound to the corresponding option value in the select list ( presuming it is the two character ISO country code that is returned ). A CSS file was created to bind the option values to the corresponding flags.

So all that is needed is to refer to https://www.speech2form.com/assets/img/flags/select_flags.css on your page:
...and add the class flag to your select item:

When you define the country code in lower case as the return value of your select list you will see the flags in front of the country names:
In the CSS files default values for the option element have been set. You can tweak them to get the best appearance for your application. With margin and padding you can influence the spacing of the option elements. In this solution the files reside on a remote server ( http://www.speech2form.com ).

If you want the files in the database you can download the ZIP file here. You can import the file in your application. The option to unzip should be checked.
Reference the static file select_flags.css on your page and you can use the flag images stored in the database.
After a mornings work I find out that the background images for options only work in firefox! Sigh... When a new solution is available I will get back to you.

Happy coding, Dick Dral

Thursday 26 May 2016

A generator for pipelined functions

One of the options for solving performance issues is the use of pipelined functions. The performance of queries can in some cases be improved dramatically by the use of PL/SQL instead of pure SQL.
The setup of pipelined functions requires however the creation of two object types for the return values and a function in which these object type are filled with values. There is a lot of typing before you can start to create the actual logic.
For this purpose the Oracle Pipelined Function Generator is created. With this tool you can generate a skeleton for the pipelined function with the required types. You can start coding the logic immediately!
The basis of the generation is a table definition with column names and data types. A script for the following objects is generated :
  • the pipelined function in a package with a query based on the table definition
  • the view to encapsulate the pipelined function

In answer to the comment of Denes the separate types have been replaced by types declared within a package

If your pipelined functions recieves parameters you can use the technique with package variables that is described in another blogpost.
The online generation of the objects is available here:


Happy coding,
Dick Dral

PS This generator is an overhauled version of my old generator. The formatting of the create script has been improved, the application's theme is changed to UT and a Copy to Clipboard button has been added.

Friday 13 May 2016

Using views with check option in Apex to protect your data

The other day I noticed a problem in an time registration system built with Apex. One employee could register hours under the name of another employee. This was possible because the application had access to the table with all the registrations and the filtering to the employee was done on the page.
One way to prevent this is to use views refering to application items. On the EMP table we create a view restricting it to one department:

create view emp_for_dept as select * from emp where deptno = v('APP_DEPTNO');

Outside of Apex this view will return no rows. Within an Apex application with the application item APP_DEPTNO set to 10, 20 or 30 the view will return the rows for that specific department. This way it is possible to limit the visible rows in a report.
It gets even better when we create the view with check option:

create view emp_for_dept as 
select * from emp 
where deptno = ( select v('APP_DEPTNO') from dual ) 
with check option;

The check option prevents rows to be inserted or updated, that do not comply with the where clause of the view. If you have a form based on this view, you cannot change the department. If you try to do so, you will get an error:


So in the case of the time registration system mentioned above the Apex application could be based on views limited by an application item. On logon this application item can be filled with the ID of the employee and she will only see her registrations. Moreover she can only enter new registrations that match the views selection criteria, so only for her own hours.
It is an elegant and easy way of solving a security issue.

Happy apexing,
Dick Dral

PS For better performance the call to v() is wrapped in a subselect. Thanks for the tip, Andre

Wednesday 11 May 2016

Query the view sources like you query your PL/SQL source

While developing I use the view user_source many times each day to search my PL/SQL code.
In this view the source code of stored PL/SQL and triggers are provided but unfortunately the source of views is missing. Furthermore the dictionary view containing the source very old and thus the source column is of type LONG. And you cannot query on a LONG column :-(.
I have found several solutions to this problem, ranging from creating a new table using TO_LOB to convert the LONG column to using the function dbms_metadata.get_ddl ('VIEW', view_name). I don't want to create another table each time, and the solution with dbms_metadata did not perform for me, so I wrote a solution using a pipelined function, exposing the same interface as user_source.
The skeleton for the pipelined function and the types needed was created by the Pipelined function generator I created a long time ago. It still works! I used the same column definitions as the user_source view. So I ended up with these types:
create  type view_source_rowtype 
 as object 
 ( name varchar2(30) 
 , type varchar2(12) 
 , line number 
 , text varchar2(4000) 
);
/

create  type view_source_table_type as table of view_source_rowtype;
/

In the pipelined function DBMS_SQL is used to query user_views and to extract the view name and the source. The LONG column is read in chunks and each chunk is divided into lines using the Apex function apex_util.string_to_table ( I love this function, it is soo useful!). The separate lines are returned to the TABLE function with PIPE ROW including line number. The source code of the function is too long for this blog post, but you can download all the code HERE.
A view is created for easy access to the function:
create  view view_source as 
   select * 
   from table(view_source_pf());
Now you can query this view:
SQL> select * from view_source where name = 'VIEW_SOURCE';

NAME                           TYPE               LINE TEXT                                                                                               
------------------------------ ------------ ---------- ----------------------------------------------------------------------------------------------------
VIEW_SOURCE                    VIEW                  1 select "NAME","TYPE","LINE","TEXT"                                                                  
VIEW_SOURCE                    VIEW                  2    from table(view_source_pf())                                
You can now even query your PL/SQL and view code in one pass, for example if you want to look for the text label:
select * from 
(
 select * from user_source
 union all
 select * from view_source
) 
where  lower(text) like '%label%';
Happy coding, Dick Dral

Friday 29 April 2016

Apex World Dashboard

For the Apex Dashboard Competition I created an World Dashboard. It is based on the demographical and geographical data on all countries of the world. It was a lot of fun to build it and also fun to use it.


You can take a look at it using the URL shown below.

http://www.speech2form.com/ords/f?p=AWD

Using it you will discover amazing facts. The dashboard contains data on population, land use, energy use, health and transportation. You can find for example which are the countries with the most doctors or the highest percentage forest. Let yourself be surprised – at least I was. You can also see how your country compares to others in the areas afore mentioned.

In following post I will discuss some of the features I have built in like the Oracle JET Sunburst Chart or the comparison table.

Have fun!

BTW The application is available on Github if you want to examine the source code:

https://github.com/dickdral1/world_dashboard

If you want to run the application you have to install the sample data for the competition. You can find that here.

Thursday 3 March 2016

Identify Fire on Page Load DA Actions

Today I am investigating performance problems on an Oracle Apex page. On of the possible causes are JavaScript DA Actions that are Fired on page load. The following query helps to identify these DA Actions:

select distinct da.page_id
     , da.page_name
     , da.when_event_name
     , case when when_selection_type is not null then 
                    when_selection_type ||':' || when_element || when_region
            else null
       end    as  object_name
     , da.dynamic_action_name
from   apex_application_page_da_acts   act
       join apex_application_page_da   da  on ( da.dynamic_action_id = act.dynamic_action_id ) 
where  act.action_code = 'NATIVE_JAVASCRIPT_CODE'
  and  act.application_name = '[app_name]'
  and  act.page_id = [page_id]
  and  substr(act.execute_on_page_init,1,1) = 'Y'
;

Fill in the name of your application ([appname]) and the ID of the page ([page_id]) and run the query. You will get a list of the relevant DA Actions that you can check.

By the way, if you are at this point you could also run the query for the DA Fire on Page Load settings and contribute the survey. Happy Apexing, Dick Dral

Tuesday 1 March 2016

Let’s wreck the default Fire on page load option

Do you recognize the situation that you have coded a nice JavaScript Dynamic Action to respond on user input, you run the page and you notice unwanted behaviour when loading the page?
Oh no, forgot to uncheck the Fire on page load option! It happens to me all the time!

In Oracle Apex JavaScript DA steps have the option Fire on page load checked by default, as you will all be aware. PL/SQL steps have it default unchecked.
I stumble regularly over forgetting to uncheck the option. Most of the DA’s I write are about responding on user actions so I normally do not want them to execute on page load. Not unchecking the option results in unwanted behaviour which is not always obvious. One time it has cost me a few hours to come to the conclusion I should uncheck it.

I would like to have the option default unchecked. This ranks high on my Apex enhancement requests list.

To back this I decided to examine how many Javascript DA steps still have the Fire on page load option active in the application I currently work on together with 5 other developers.
This is the result:

Execute on Page LoadNumber
No365
Yes132

The ratio between unchecked and checked is 2,7! A good argument for me to have the option default unchecked.

What about the Apex builder? A query on the Apex repository for application ID’s between 4000 and 5000 results in :

Execute on Page LoadNumber
No86
Yes36

Also in their own work it would be an advantage to uncheck by default!

But how about your application? I am curious what the ratio is in your application.
If you fire the query below you can find out.

select execute_on_page_init, count(*)
from   apex_application_page_da_acts
where  action_code = 'NATIVE_JAVASCRIPT_CODE'
  and  application_name = 'appname
group by execute_on_page_init;

You can fill in the application name at appname or omit this line to query the whole Apex repository.

Please you post the results on www.speech2form.com/da_survey. If your results also show a majority for the unchecked steps I will try to convince the Apex team of unchecking the option by default for JavaScript DA steps.

#letswreckthistogether ;-).

Happy apexing,
Dick Dral